

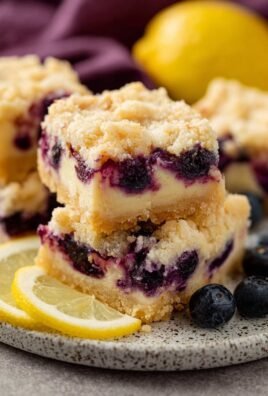
Ah, the scent of citrus and the tangy dance of cranberries – it’s a symphony of Harvest celebration flavors playing a delightful tune on your taste buds. This **Cranberry Orange Cheesecake Recipe: A Zesty Harvest celebration Treat** isn’t just dessert; it’s a memory in the making, a slice of sunshine amidst the autumn hues.
Imagine yourself, basking in the warm glow of a late November afternoon, a forkful of this creamy, vibrant cheesecake melting in your mouth – pure bliss! This isn’t your grandma’s heavy, dense cheesecake; it’s a light, airy dream, bursting with the zest of orange and the tartness of cranberries, guaranteed to steal the show at your Harvest celebration feast.
- Effortless elegance: Impress your guests with a show-stopping dessert that’s surprisingly easy to create and assemble.
- A flavor explosion: The tangy cranberries and zesty orange create a symphony of taste that’s both refreshing and indulgent.
- Visually stunning: The vibrant colors of the cranberries and orange zest make this cheesecake a feast for the eyes, a treat.
- Perfect for any occasion: While ideal for Harvest celebration, this cheesecake is a guaranteed crowd-pleaser any time of the year and season.
Ingredients for Cranberry Orange Cheesecake Recipe: A Zesty Harvest celebration Treat
Here’s what you’ll need to make this delicious dish:
The full ingredients list, including measurements, is provided in the recipe card directly below.
How to Make Cranberry Orange Cheesecake Recipe: A Zesty Harvest celebration Treat
Follow these simple steps to prepare this delicious dish:
Step 1: Prepare the Graham Cracker Crust
In a food processor, pulse the graham crackers until they form fine crumbs. Then, mix the graham cracker crumbs with melted butter until well combined. Press the mixture firmly into the bottom of a 9-inch springform pan to create an even crust.
Step 2: Bake the Crust
Bake the graham cracker crust in a preheated oven at 350°F (175°C) for 8-10 minutes, or until lightly golden. Remove from the oven and let it cool slightly while you prepare the cheesecake filling.
Step 3: Make the Cheesecake Filling
In a large bowl, beat the softened cream cheese and granulated sugar together until smooth and creamy. Add the eggs one at a time, mixing well after each addition. Stir in the orange zest, orange juice, Alcohol-free vanilla extract, and sour cream until everything is well combined.
Step 4: Assemble the Cheesecake
Pour half of the cheesecake filling over the prepared graham cracker crust. Swirl in the cranberry sauce, then pour the remaining cheesecake filling on top. Use a toothpick or knife to create a marbled effect by gently swirling the cranberry sauce throughout the filling.
Step 5: Bake the Cheesecake
Bake the cheesecake in the preheated oven at 325°F (160°C) for 55-65 minutes, or until the edges are set but the center still has a slight jiggle. Turn off the oven and let the cheesecake cool inside for an hour with the door slightly ajar.
Step 6: Chill and Serve
Remove the cheesecake from the oven and let it cool completely at room temperature. Then, cover it with plastic wrap and chill in the refrigerator for at least 4 hours, or preferably overnight, before serving. Garnish with fresh cranberries and orange zest for the perfect finishing touch.
Perfecting the Cooking Process

To achieve cheesecake nirvana, tackle the crust first, giving it ample time to cool. Then, blend your filling until it’s silky smooth, avoiding over-mixing. Finally, bake low and slow to prevent cracks and ensure a creamy texture.
Add Your Touch
Feeling adventurous? Swirl in some white chocolate ganache for extra decadence. Or, add a hint of cardamom to the crust for a warm, spicy note. You could even try different citrus fruits like mandarin oranges for a unique twist.
Storing & Reheating
Once cooled, store your cranberry orange cheesecake recipe: a zesty Harvest celebration treat in the refrigerator, tightly covered, for up to 5 days. To reheat, allow slices to come to room temperature for about 30 minutes before serving for the best flavor.
Here are some helpful tips for nailing this recipe:
- Don’t overbake! A slight jiggle in the center is perfect; it will firm up as it cools, preventing a dry, cracked cheesecake.
- Use room-temperature ingredients for the filling, ensuring a smooth, lump-free batter that bakes evenly, creating the best texture.
- For a cleaner cut, chill the cheesecake thoroughly before slicing, and use a warm, damp knife for each slice to prevent sticking.
(Personal anecdote)
My Aunt Carol once declared my first attempt “edible, but dense.” I’ve been chasing cheesecake perfection ever since, and let me tell you, this cranberry orange version is a far cry from that initial brick!
Let’s Talk Crust, Baby! (The Graham Cracker Kind)
Okay, people, let’s get real. The crust. It’s the foundation of our cranberry orange cheesecake recipe: a zesty Harvest celebration treat, the unsung hero holding everything together. Too crumbly? Disaster. Too soggy? Equally disastrous. We need a crust that’s sturdy, slightly sweet, and ready to party. We’re not talking about some fancy-pants pastry crust here. Nope. We’re sticking with the classic graham cracker crust. Why? Because it’s easy, delicious, and frankly, who has time to make pastry crust when there’s a Harvest celebration feast to prepare? Plus, the subtle graham cracker flavor perfectly complements the tangy cranberry and bright orange notes in the filling. We’re aiming for that perfect textural contrast – the creamy, smooth filling against the slightly sandy, buttery crust. It’s a symphony of textures, I tell you! So, pay attention to the crust. It matters! Don’t underestimate the power of a well-made graham cracker crust. It can make or break your cranberry orange cheesecake masterpiece. Seriously, I’ve seen it happen. Tears were shed. Let’s avoid the tears, okay?
The Secret to the Perfect Graham Cracker Crust (It’s Not Rocket Science, I Promise)
Listen up, because I’m about to drop some serious graham cracker crust knowledge on you. First things first: the crumbs. You can buy pre-made graham cracker crumbs, but honestly, where’s the fun in that? Plus, crushing them yourself gives you a little stress relief. Take those graham crackers, throw them in a food processor (or a ziplock bag and beat them with a rolling pin if you’re feeling particularly stressed), and pulse/bash them until they’re finely ground. Now, the butter. Melted butter is key here. It binds the crumbs together and creates that delicious, slightly crisp texture. Make sure your butter is completely melted, but not boiling. We’re not making browned butter here (although, that could be interesting…). Then, there’s the sugar. Just a touch of sugar is all you need to enhance the sweetness of the graham crackers. A little brown sugar adds a nice molasses note, but granulated sugar works just fine too. Mix it all together, press it firmly into your springform pan (I’ll get to that later), and bake it until it’s golden brown and fragrant. That’s it! You’ve got yourself a perfect graham cracker crust. Now, go forth and conquer!
Springform Pan Shenanigans (Why You Need One, and How to Use It)
Alright, let’s talk springform pans. If you’ve never used one before, don’t be intimidated. It’s basically a cake pan with removable sides, which makes it super easy to release your cheesecake without destroying it in the process. Trust me, you want a springform pan for this cranberry orange cheesecake recipe: a zesty Harvest celebration treat. You could technically try to make it in a regular cake pan, but getting it out in one piece will be a Herculean task. And nobody wants a crumbly, broken cheesecake on Harvest celebration. So, invest in a springform pan. They’re not that expensive, and you’ll use it for all sorts of cheesecakes, quiches, and even some cakes. When using a springform pan, make sure to grease it well, especially the bottom. I like to use cooking spray, but you can also use butter or shortening. Then, press your graham cracker crust into the bottom of the pan, and bake it according to the recipe instructions. Once the crust is baked and cooled, you’re ready to add the filling. And when the cheesecake is done baking, let it cool completely in the pan before releasing it. This will help prevent it from cracking.
The Creamy Dreamy Filling (Where the Magic Happens)
Okay, now for the star of the show: the creamy, dreamy filling. This is where the cranberry and orange flavors really shine, creating a symphony of tangy, sweet, and citrusy goodness. We’re talking about a filling that’s so smooth and luscious, it practically melts in your mouth. We want it to be rich, but not heavy, sweet, but not cloying, and perfectly balanced in flavor. This filling is what elevates this cranberry orange cheesecake recipe: a zesty Harvest celebration treat from ordinary to extraordinary. But achieving this level of perfection requires a little bit of attention to detail. It’s not just about throwing a bunch of ingredients into a bowl and mixing them together. No, no, no. We need to be precise, gentle, and mindful of each step. We’re creating a masterpiece here, people! So, put on some good music, pour yourself a cup of tea (or coffee, if that’s your thing), and let’s get to work on this amazing filling.
The Key Ingredients (And Why They Matter)
Let’s break down the key ingredients that make this cheesecake filling so irresistible. First, we have cream cheese. Full-fat cream cheese is essential for that rich, creamy texture. Don’t even think about using low-fat cream cheese. It will result in a grainy, watery cheesecake. Trust me, I’ve been there, done that. It’s not pretty. Then, we have sour cream. Sour cream adds a touch of tanginess that balances the sweetness of the cream cheese and sugar. It also helps to create a lighter, more airy texture. Next up is sugar. Granulated sugar works perfectly fine, but you can also use a little bit of brown sugar for a deeper, more complex flavor. Eggs are essential for binding the filling together and giving it structure. Use large eggs at room temperature for best results. And finally, we have the cranberry and orange components. Fresh cranberries are best, but you can also use frozen cranberries if you can’t find fresh ones. Orange zest is essential for that bright, citrusy flavor.
Cranberry Orange Swirl Technique
The cranberry orange swirl is what makes this cheesecake visually stunning and adds a burst of flavor in every bite. This is how to create a swirl: after preparing the batter, divide it in half. To one bowl, gently fold in your cranberry sauce (homemade or store-bought, but choose a good quality one). Leave the other half of the batter plain. Now, spoon dollops of the plain batter and cranberry batter alternately into your prepared springform pan. Once you’ve used up all the batter, use a knife or skewer to gently swirl the two batters together. Be careful not to over-swirl, as this can muddy the colors. You want to see distinct streaks of cranberry and plain batter.
Baking and Cooling (Patience is a Virtue)
Baking a cheesecake is a delicate process. We want a perfectly cooked cheesecake that is firm around the edges but still has a slight jiggle in the center. This indicates that the cheesecake is done but not overbaked. Overbaking can lead to a dry, cracked cheesecake, and nobody wants that. Low and slow is the key. The lower the temperature, the more evenly the cheesecake will bake, and the less likely it will be to crack. A water bath is your best friend. A water bath helps to create a humid environment in the oven, which prevents the cheesecake from drying out and cracking. But it’s important to wrap the springform pan tightly in foil to prevent water from seeping into the crust. Once the cheesecake is done baking, turn off the oven and let the cheesecake cool in the oven with the door slightly ajar for an hour. This allows the cheesecake to cool gradually, which further prevents cracking.
(Personal anecdote)
I tried to rush the cooling process once, and my cheesecake resembled the Grand Canyon. Lesson learned: patience is indeed a virtue when it comes to cheesecake.
Serving Suggestions and Harvest celebration Flair
Finally, the moment we’ve all been waiting for: serving the cranberry orange cheesecake recipe: a zesty Harvest celebration treat! This cheesecake is delicious on its own, but you can also dress it up with some toppings. A dollop of whipped cream is always a good choice. Or, you can drizzle it with some extra cranberry sauce or orange marmalade. Fresh cranberries and orange slices make a beautiful garnish. For Harvest celebration flair, consider adding a sprinkle of chopped pecans or walnuts. You can also serve it with a side of cranberry compote or orange segments. And if you really want to impress your guests, you can make a cranberry orange glaze to drizzle over the top.
Conclusion for Cranberry Orange Cheesecake Recipe: A Zesty Harvest celebration Treat
This Cranberry Orange Cheesecake Recipe is more than just a dessert; it’s a holiday experience. The creamy texture, bright citrus notes, and tart cranberry swirl create a symphony of flavors that will delight your guests. Whether you’re a seasoned baker or a kitchen newbie, this recipe is designed to bring a touch of zesty elegance to your Harvest celebration table. So gather your ingredients, preheat that oven, and get ready to create a dessert that will have everyone asking for seconds!
Print
Cranberry Orange Cheesecake Recipe: A Zesty Thanksgiving Treat
Delicious cranberry orange cheesecake recipe: a zesty thanksgiving treat recipe with detailed instructions and nutritional information.
- Total Time: 35 minutes
- Yield: 4 servings
Ingredients
- Graham crackers crumbs: 1 1/2 cups
- Unsalted butter, melted: 6 tablespoons
- Cream cheese, softened: 32 ounces
- Granulated sugar: 1 1/4 cups
- Large eggs: 4
- Orange zest: 2 tablespoons
- Orange juice: 1/4 cup
- Cranberry sauce: 1 cup
Instructions
- Step 1: Preheat oven to 350°F (175°C). Combine graham cracker crumbs and melted butter in a bowl and press into the bottom of a 9-inch springform pan. Bake for 8-10 minutes, then let cool.
- Step 2: In a large bowl, beat the softened cream cheese and granulated sugar until smooth and creamy.
- Step 3: Beat in the eggs one at a time, then stir in the orange zest and orange juice until combined.
- Step 4: Gently swirl in the cranberry sauce into the cheesecake batter, being careful not to overmix.
- Step 5: Pour the cheesecake batter over the cooled graham cracker crust and bake for 55-70 minutes, or until the center is just slightly jiggly.
- Step 6: Turn off the oven and let the cheesecake cool in the oven with the door slightly ajar for 1 hour. Then, remove from the oven and chill in the refrigerator for at least 4 hours, or preferably overnight, before serving.
Notes
- For best flavor, store leftover cheesecake tightly covered in the refrigerator for up to 3 days.
- If you prefer a warm slice, gently warm individual portions in the microwave for 15-20 seconds.
- Garnish each slice with a dollop of whipped cream and a sprinkle of extra orange zest for an elegant presentation.
- To prevent cracks, place a pan of water on the bottom rack of the oven while baking for added moisture.
- Prep Time: 15 minutes
- Cook Time: 20 minutes
- Method: Stovetop
- Cuisine: American
FAQs
Can I make this Cranberry Orange Cheesecake Recipe ahead of time?
Absolutely! This zesty Harvest celebration treat is actually better when made a day or two in advance. The flavors meld together beautifully as it chills in the refrigerator. Just wrap it tightly to prevent it from drying out. Think of it as a culinary superpower: you get to relax on Harvest celebration Day knowing your dessert is already a masterpiece. Plus, who doesn’t love a good make-ahead dessert that saves you time and stress when you’re hosting a big gathering? It’s a win-win situation for everyone involved, especially you, the master chef!
What’s the best way to prevent cracks in my cheesecake?
Ah, the dreaded cheesecake crack! To avoid this dessert disaster, bake your cheesecake in a water bath. This provides gentle, even heat that minimizes cracking. Also, don’t overbake it. The center should still have a slight wiggle. And here’s a secret: after baking, turn off the oven and let the cheesecake cool inside for an hour with the door slightly ajar. Gradual cooling is your friend. Trust me, following these tips will lead to a smooth, creamy, and crack-free Cranberry Orange Cheesecake, a true Harvest celebration showstopper.
Can I substitute the oranges in this Cranberry Orange Cheesecake Recipe?
While oranges provide a quintessential zest to this Harvest celebration delight, you can certainly experiment! Clementines or tangerines can offer a similar sweet and citrusy note. Lemon zest could also work, but be mindful of the tartness – you may need to adjust the sweetness accordingly. Remember, baking is a science, but it’s also an art! Feel free to get creative with your citrus choices. Just ensure the substitution complements the cranberry flavor for that perfect festive balance. So, go ahead, unleash your inner citrus artist!
How long will this Cranberry Orange Cheesecake last?
Properly stored in the refrigerator, this Cranberry Orange Cheesecake will last for about 5 days. Make sure to wrap it tightly in plastic wrap or store it in an airtight container to prevent it from drying out. After all, we want every slice to be as delicious as the first! If you find yourself with extra cheesecake (a rare occurrence, I know), you can also freeze it for longer storage. Just thaw it in the refrigerator overnight before serving. This way, you can enjoy a taste of Harvest celebration long after the holiday is over!

Leave a Comment