

Ah, Spring celebration. A time for egg hunts, pastel sweaters, and enough chocolate bunnies to fuel a small rocket ship. But let’s be honest, what’s Spring celebration without a show-stopping dessert that’s as fun to make as it is to eat? Get ready to dig in, because our Spring celebration Dirt Cake Recipe is about to become your new holiday tradition!
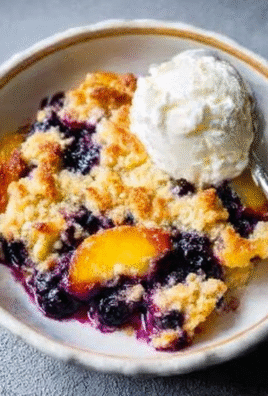
This isn’t your grandma’s fussy, floral-decorated cake. Forget delicate piping and perfectly placed sprinkles. We’re diving headfirst into a playful, delicious mess that’s guaranteed to bring out the kid in everyone. Imagine layers of creamy pudding, crushed chocolate cookies, and gummy worms galore, all topped with festive Spring celebration candies.
Here are a few reasons why this Spring celebration Dirt Cake Recipe will be the star of your holiday feast:
Easy peasy preparation makes it perfect for involving little helpers in the kitchen, creating cherished memories.
The delightful combination of rich chocolate, smooth pudding, and playful candy offers a symphony of textures and tastes.
Its whimsical appearance, complete with edible “dirt” and colorful decorations, is sure to capture the imagination of young and old alike.
Adaptable to your creative whims, this recipe lets you customize decorations and fillings to match your personal taste and Spring celebration theme.
Ingredients for Spring celebration Dirt Cake Recipe
Here’s what you’ll need to make this delicious dish:
The full ingredients list, including measurements, is provided in the recipe card directly below.
How to Make Spring celebration Dirt Cake Recipe
Follow these simple steps to prepare this delicious dish:
Step 1: Crush the Cookies
Place the chocolate sandwich cookies in a large zip-top bag. Remove as much air as possible. Then, using a rolling pin or your hands, crush the cookies into fine crumbs. Set aside.
Step 2: Prepare the Pudding
In a large bowl, whisk together the instant chocolate pudding mix and milk according to the package directions. Let the pudding set for a few minutes until it thickens slightly.
Step 3: Combine the Cream Cheese and Whipped Topping
In a separate bowl, beat the softened cream cheese until smooth and creamy. Gently fold in the whipped topping until well combined.
Step 4: Assemble the Spring celebration Dirt Cake
In a large trifle bowl or clear serving dish, create layers: Start with a layer of crushed chocolate cookies, followed by a layer of chocolate pudding, and then a layer of the cream cheese mixture. Repeat the layers until all the ingredients are used, ending with a top layer of crushed cookies.
Step 5: Decorate and Chill
Arrange gummy worms and Spring celebration candies on top of the cake to create a festive Spring celebration scene. Cover the cake with plastic wrap and refrigerate for at least 2 hours to allow the flavors to meld together.
Step 6: Serve and Enjoy
Remove the Spring celebration Dirt Cake from the refrigerator and serve chilled. Watch as everyone digs in with delight! This playful dessert is guaranteed to be a hit at your Spring celebration celebration.
Perfecting the Cooking Process

To nail this dessert, start by prepping your pudding mix. While that’s setting, crush your chocolate cookies. Layering is key. Pudding, cookie crumbs, gummy worms, repeat! This ensures every bite is a delightful mix of textures and flavors.
Add Your Touch
Want to jazz it up? Try adding some chopped strawberries or blueberries for a fruity twist. For extra sweetness, drizzle a little caramel sauce between the layers. Alternatively, use vanilla wafers instead of chocolate cookies for a lighter flavor.
Storing & Reheating
This Spring celebration dirt cake recipe is best served chilled. Store it in an airtight container in the refrigerator for up to three days. No reheating needed – just grab a spoon and dig in! It’s the perfect make-ahead dessert for your Spring celebration celebration.
Here are some tips to ensure your Spring celebration dirt cake is a smashing success:
- Don’t skip chilling the pudding! This ensures a firm base and prevents a soggy dirt cake.
- Crush your cookies evenly. You want a fine crumb texture, not big chunks that can make it hard to layer.
- Get creative with your decorations! Add different candies, sprinkles, or even edible flowers to personalize your masterpiece.
(Personal anecdote formated as paragraph subheading)
The first time I made this, my nephew thought I’d actually dug up dirt. The look on his face when he realized it was dessert was priceless! Now, it’s a must-have for every family gathering.
Digging into Deliciousness: An Spring celebration Dirt Cake Adventure
Spring celebration is just around the corner, and you know what that means? It’s time to ditch the fancy, complicated desserts and embrace the pure, unadulterated joy of… dirt! Okay, not actual dirt, of course. We’re talking about the legendary Spring celebration dirt cake recipe, a whimsical, ridiculously easy, and utterly irresistible treat that will have everyone – from toddlers to Great Aunt Mildred – clamoring for seconds.
Forget spending hours slaving away in the kitchen trying to perfect some delicate pastry. This Spring celebration dirt cake recipe is all about fun, simplicity, and letting your inner child run wild. Imagine layers of creamy pudding, crunchy chocolate cookie “dirt,” and a vibrant garden of gummy worms and colorful candy “flowers.” It’s like a party in a bowl, and you’re invited!
Why This Spring celebration Dirt Cake Recipe is a Game Changer
Let’s be honest, Spring celebration desserts can be a bit… predictable. You’ve got your pastel-colored cupcakes, your fussy pies, and maybe even a fancy chocolate bunny that nobody actually wants to eat. But this Spring celebration dirt cake recipe? It’s a rebel. It’s unexpected. It’s the dessert equivalent of wearing bunny ears to a formal dinner party.
This recipe isn’t just about taste; it’s about the experience. It’s about getting your hands dirty (pun intended!), letting your creativity shine, and creating a dessert that’s as fun to make as it is to eat. Plus, it’s virtually foolproof. Even if you’re a kitchen novice, you can whip this up with confidence. No fancy techniques, no complicated steps, just pure, delicious fun.
Gathering Your Garden Goodies: Ingredients You’ll Need
Alright, let’s get down to the nitty-gritty. Here’s what you’ll need to create your own edible dirt masterpiece:
- **Chocolate Sandwich Cookies:** These are the foundation of your “dirt.” Aim for the classic chocolate sandwich cookies – the ones with the creamy filling. Trust me, the filling adds a touch of extra sweetness and helps bind the crumbs together.
- **Instant Pudding Mix:** Vanilla or chocolate pudding mix works best, but feel free to experiment! Butterscotch or even banana pudding could add a fun twist.
- **Milk:** The magic liquid that transforms your pudding mix into creamy goodness. Use whatever kind you prefer – whole milk, 2%, or even a plant-based alternative.
- **Whipped Topping:** This adds a light and airy layer of sweetness. You can use store-bought or make your own, if you’re feeling ambitious.
- **Gummy Worms:** No dirt cake is complete without these wiggly little guys! They add a playful touch and a chewy texture that kids (and adults) will love.
- **Candy Flowers and Decorations:** This is where you can really let your creativity shine! Use any kind of candy you like – jelly beans, chocolate eggs, sprinkles, edible glitter – to create a vibrant and whimsical garden on top of your dirt cake.
From Cookie Crumbs to Candy Blooms: Assembling Your Spring celebration Dirt Cake
Now for the fun part: putting it all together! Here’s a step-by-step guide to creating your Spring celebration dirt cake masterpiece:
1. **Crush the Cookies: ** This is a great task to delegate to kids! Place the chocolate sandwich cookies in a large resealable bag and crush them into fine crumbs using a rolling pin or a food processor. The finer the crumbs, the more authentic your “dirt” will look.
2. **Prepare the Pudding: ** In a large bowl, whisk together the instant pudding mix and milk according to the package directions. Let it sit for a few minutes to thicken up.
3. **Layer It Up: ** Now it’s time to assemble your dirt cake! In a large trifle bowl or individual clear cups, layer the ingredients in the following order: a layer of crushed chocolate cookies, a layer of pudding, a layer of whipped topping. Repeat the layers until all the ingredients are used, ending with a final layer of cookie crumbs.
4. **Decorate Your Garden: ** This is where you can really let your imagination run wild! Arrange the gummy worms and candy flowers on top of the dirt cake to create a whimsical and colorful garden. You can even add some edible glitter for extra sparkle.
5. **Chill and Serve: ** Cover the dirt cake with plastic wrap and refrigerate for at least 30 minutes to allow the flavors to meld together. Serve chilled and watch as everyone devours your delicious dirt masterpiece.
Beyond the Basics: Elevating Your Spring celebration Dirt Cake Recipe
While the basic Spring celebration dirt cake recipe is delicious on its own, there are plenty of ways to customize it and make it your own. Here are a few ideas to get you started:
- **Add a Fruity Twist:** Mix in some chopped strawberries, blueberries, or raspberries for a burst of fresh flavor.
- **Go Nutty:** Sprinkle some chopped pecans, walnuts, or almonds between the layers for added crunch and flavor.
- **Spice It Up:** Add a dash of cinnamon or nutmeg to the pudding mix for a warm and cozy flavor.
- **Get Creative with the “Dirt”:** Use different types of cookies for the “dirt,” such as graham crackers or vanilla wafers.
- **Make Individual Cups:** Instead of a large trifle bowl, assemble the dirt cake in individual clear cups for a fun and portable treat.
Troubleshooting Your Spring celebration Dirt Cake Recipe
Even with the simplest recipes, things can sometimes go awry. Here are a few common problems and how to fix them:
- **Soggy Dirt Cake:** Make sure to chill the dirt cake for at least 30 minutes before serving. This will help the pudding set and prevent the cookies from getting soggy.
- **Lumpy Pudding:** Whisk the pudding mix and milk vigorously to avoid lumps. If you still end up with a few lumps, try using an immersion blender to smooth it out.
- **Too Sweet:** If you find the dirt cake too sweet, try using a less sweet whipped topping or adding a layer of plain yogurt between the layers.
- **Not Enough “Dirt”:** Make sure to use enough cookies to create a thick layer of “dirt.” You can always add more if needed.
The Spring celebration Dirt Cake Recipe: A Guaranteed Crowd-Pleaser
So, there you have it – the ultimate Spring celebration dirt cake recipe. It’s easy, fun, customizable, and guaranteed to be a hit with everyone. So ditch the complicated desserts this year and embrace the delicious simplicity of dirt! Happy Spring celebration baking! This **Spring celebration Dirt Cake Recipe** will not disappoint!
Conclusion for Spring celebration Dirt Cake Recipe :
This **Spring celebration Dirt Cake Recipe** isn’t just a dessert; it’s a nostalgic trip down memory lane with a festive twist. With layers of crushed cookies, creamy pudding, and playful gummy worms, this treat is guaranteed to bring smiles to faces of all ages. Quick to assemble, and easily customizable, it’s the perfect centerpiece for your Spring celebration celebration. So gather your ingredients, unleash your inner child, and create a cake that’s as fun to make as it is to eat!
Print
Easter Dirt Cake Recipe
Delicious easter dirt cake recipe recipe with detailed instructions and nutritional information.
- Total Time: 35 minutes
- Yield: 4 servings
Ingredients
- Oreo cookies, crushed with filling removed: 36 cookies
- Cream cheese, softened: 8 ounces
- Unsalted butter, softened: 1/2 cup (1 stick)
- Powdered sugar: 3 cups
- Milk: 2 cups
- Vanilla Instant Pudding Mix: 2 (3.4 ounce) boxes
- Cool Whip, thawed: 1 (8 ounce) container
- Gummy worms: 1 package
Instructions
- Step 1: Crush the Oreo cookies in a food processor or zip-top bag until they resemble dirt. Set aside a few tablespoons for topping.
- Step 2: In a large bowl, cream together the softened cream cheese and butter until smooth. Gradually beat in the powdered sugar until well combined.
- Step 3: In a separate bowl, whisk together the milk and instant pudding mix until smooth. Let it stand for 2-3 minutes to slightly thicken.
- Step 4: Gently fold the pudding mixture into the cream cheese mixture until well combined. Then, gently fold in the Cool Whip.
- Step 5: In a large bowl or trifle dish, layer a third of the crushed Oreo cookies, then a third of the cream cheese mixture. Repeat layers twice.
- Step 6: Top with the remaining crushed Oreo cookies and garnish with gummy worms to resemble worms crawling out of the dirt. Refrigerate for at least 2 hours before serving.
Notes
- To keep your dirt cake fresh and delicious, store it covered in the refrigerator for up to 3 days.
- Since this dessert is served cold, there's no need to reheat it; just grab a spoonful straight from the fridge!
- Serve your Easter Dirt Cake in individual clear cups for a cute and festive presentation that's easy to handle.
- For a richer flavor, let the cream cheese and butter come to true room temperature; this will make the creaming process smoother and result in a more decadent filling.
- Prep Time: 15 minutes
- Cook Time: 20 minutes
- Method: Stovetop
- Cuisine: American
FAQs :
Can I make this Spring celebration Dirt Cake Recipe ahead of time?
Absolutely! In fact, I highly recommend it. The flavors meld together beautifully when the cake sits in the refrigerator for a few hours or even overnight. Just assemble the cake as directed, cover it tightly with plastic wrap, and pop it in the fridge. The cookies will soften slightly, which only adds to the deliciousness. This makes it a perfect dessert to prepare in advance for your Spring celebration celebration. Just remember to add your gummy worms and decorations right before serving so they don’t get soggy!
What can I use instead of pudding in this Spring celebration Dirt Cake Recipe?
If you’re not a fan of pudding (gasp!), or you just want to switch things up, there are some great alternatives you can explore. You could use a stabilized whipped cream, like a homemade version sweetened with powdered sugar and a touch of alcohol-free vanilla extract. Alternatively, a thick vanilla custard could work wonders, adding a richness similar to the pudding. For a lighter option, consider a Greek yogurt mixed with honey and vanilla. Just make sure whatever you use has a similar consistency to pudding so your layers stay nice and defined.
How do I make this Spring celebration Dirt Cake Recipe gluten-free?
Making this dessert gluten-free is easier than you might think! The key is to swap out the chocolate sandwich cookies for a gluten-free version. Luckily, there are some really tasty gluten-free chocolate cookie options available these days. Just crush them up as you would regular cookies. You might also want to check your pudding mix to ensure it’s gluten-free. Most are, but it’s always good to double-check. With these simple substitutions, everyone can enjoy this festive Spring celebration treat.
What are some fun variations for this Spring celebration Dirt Cake Recipe?
Oh, the possibilities are endless! Get creative with your decorations! Instead of just gummy worms, try adding candy eggs, pastel sprinkles, or even edible flowers. You could also mix in some crushed peanut butter cups for a chocolate-peanut butter twist. For an extra layer of flavor, consider adding a thin layer of raspberry jam between the cookie layers. Another idea is to use different flavors of pudding, like banana or pistachio. Don’t be afraid to experiment and create your own signature Spring celebration Dirt Cake masterpiece!


Leave a Comment