

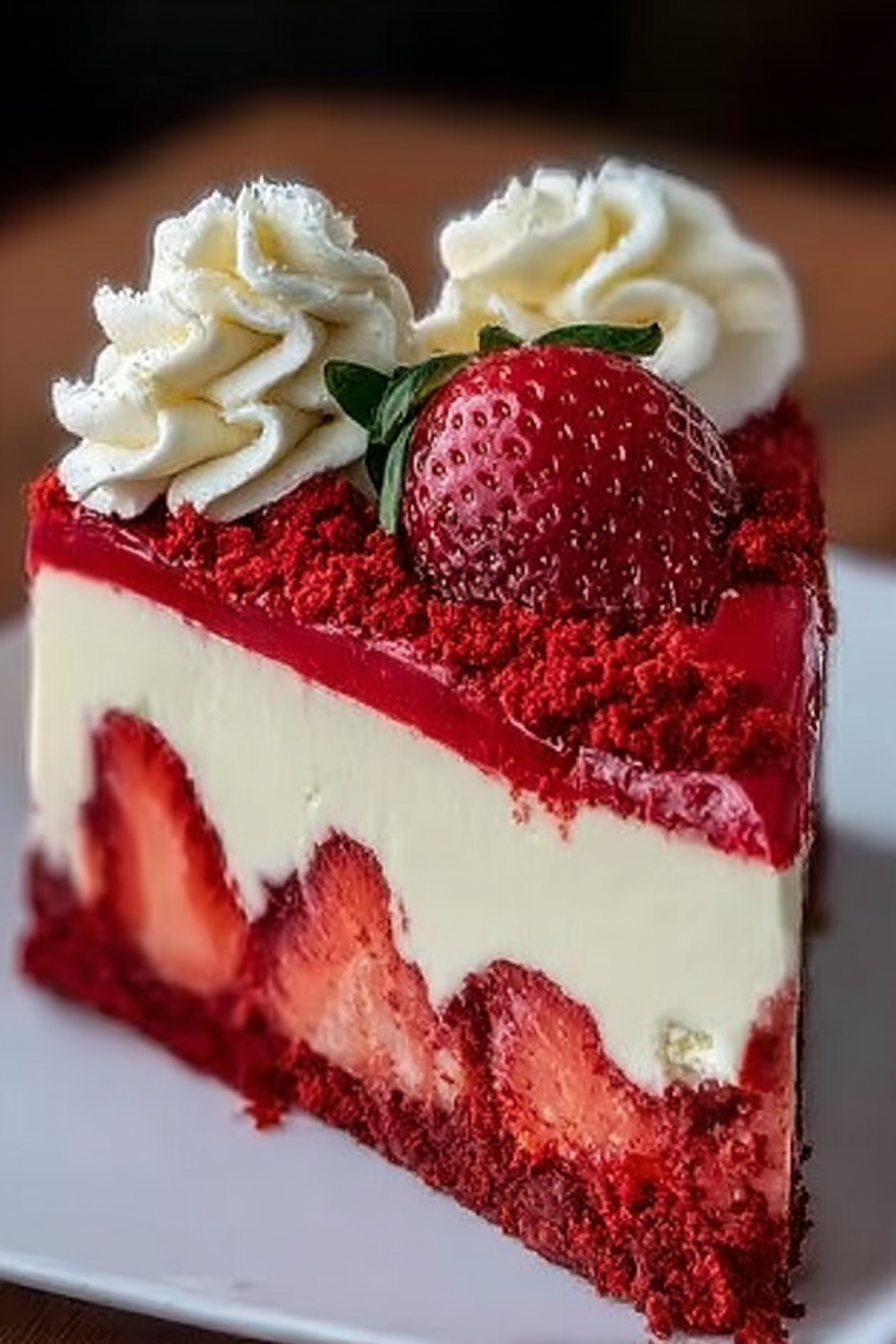
Imagine biting into a dessert that swirls together the tangy bliss of cheesecake, the rich cocoa undertones of red velvet, and the sweet burst of fresh strawberries. This Strawberry Red Velvet Cheesecake is a symphony of flavors, each note harmonizing to create a truly unforgettable experience.
Whether it’s a special occasion or just a Tuesday night that needs a little sparkle, this Strawberry Red Velvet Cheesecake brings joy. Imagine the smiles you’ll get when presenting this beautiful dessert, a promise of delightful flavors and happy memories, a perfect finale to any gathering.
- Effortless to make, it combines the best of both worlds: red velvet cake and creamy cheesecake in one delightful dessert.
- The combination of red velvet, cheesecake, and fresh strawberries creates a multi-layered flavor profile that delights the senses.
- Its striking red and white layers, studded with vibrant strawberries, make it a visually stunning centerpiece for any table.
- Adaptable for any event, this cheesecake is as perfect for a casual family dinner as it is for an elegant celebration.
Ingredients for Strawberry Red Velvet Cheesecake
Here’s what you’ll need to make this delicious dish:
The full ingredients list, including measurements, is provided in the recipe card directly below.
How to Make Strawberry Red Velvet Cheesecake
Follow these simple steps to prepare this delicious dish:
Step 1: Prepare the Red Velvet Cake Layers
Preheat your oven to 350°F (175°C). Grease and flour two 9-inch round cake pans. In a large bowl, whisk together the flour, sugar, cocoa powder, baking soda, and salt. Add the eggs, oil, buttermilk, red food coloring, vinegar, and Alcohol-free vanilla extract. Mix until just combined. Divide the batter evenly between the prepared cake pans.
Step 2: Bake the Cake Layers
Bake for 25-30 minutes, or until a toothpick inserted into the center comes out clean. Let the cakes cool in the pans for 10 minutes, then invert them onto a wire rack to cool completely.
Step 3: Prepare the Cheesecake Filling
In a large bowl, beat the softened cream cheese and sugar until smooth and creamy. Add the sour cream and Alcohol-free vanilla extract, and beat until well combined. In a small saucepan, combine the agar-agar powder with water according to package instructions. Bring to a simmer and cook until the agar-agar is fully dissolved. Let cool slightly.
Step 4: Assemble the Cheesecake
Fold the agar-agar mixture into the cream cheese mixture. Gently fold in half of the chopped strawberries. Place one red velvet cake layer on a serving plate. Spread the cheesecake filling evenly over the cake layer. Top with the second red velvet cake layer.
Step 5: Chill and Garnish
Refrigerate the cheesecake for at least 4 hours, or preferably overnight, to allow the filling to set completely. Before serving, garnish with the remaining fresh strawberries.
Step 6: Serve and Enjoy
Slice and serve this Strawberry Red Velvet Cheesecake chilled. Enjoy the delightful combination of flavors and textures in every bite. This cheesecake is perfect for any occasion and is sure to impress!
Perfecting the Cooking Process

To nail this strawberry red velvet cheesecake, get organized! First, bake the red velvet base. While it cools, whip up the cheesecake filling. Finally, layer it all together with the strawberry topping and chill. This efficient sequence ensures each component is perfect.
Add Your Touch
Feel like experimenting? Swap out the strawberries for raspberries or blueberries for a different fruity twist. For a richer flavor, try adding a hint of Alcohol-free vanilla extract to the cheesecake filling. You can also sprinkle some white chocolate shavings on top for an elegant look.
Storing & Reheating
This decadent dessert is best stored in the refrigerator, covered, for up to 3 days. Unfortunately, reheating isn’t recommended, as it can affect the texture of the cheesecake. Just slice and enjoy straight from the fridge for the best experience!
Here are some tips for making the best strawberry red velvet cheesecake:
- For a vibrant red color in your cake, use a high-quality red food coloring, but don’t overdo it or it can taste artificial.
- Make sure all your ingredients are at room temperature before mixing the cheesecake filling to avoid lumps and ensure a smooth texture.
- When baking the cheesecake, use a water bath to prevent cracking and ensure even cooking for a creamy, dreamy texture.
(Personal anecdote formated as paragraph subheading)
I remember the first time I made this for a friend’s birthday. Everyone raved about it, and honestly, I felt like a baking superstar. The empty plates were the best compliment!
Strawberry Red Velvet Cheesecake: A Love Story in Layers
Let’s talk about **strawberry red velvet cheesecake**. It’s not just a dessert; it’s an experience. Imagine a velvety smooth cheesecake nestled atop a vibrant red velvet base, all crowned with a luscious strawberry topping. Sounds dreamy, right? Well, get ready to make that dream a reality.
This isn’t your grandma’s cheesecake (unless your grandma is a total baking rockstar, in which case, kudos, Grandma!). This is a modern twist on a classic, combining the tangy creaminess of cheesecake with the subtle chocolate notes and striking color of red velvet cake, all brightened by the sweetness of fresh strawberries. It’s like a party in your mouth, and everyone’s invited.
Why Strawberry Red Velvet Cheesecake? Because Why Not?!
Okay, I get it. Maybe you’re thinking, “Red velvet? Cheesecake? Strawberries? Is this too much?” And to that, I say, absolutely not! Life is too short for boring desserts. This is a dessert that makes a statement, a dessert that demands attention, a dessert that whispers sweet nothings of deliciousness into your ear.
Plus, it’s surprisingly easy to make. Don’t let the fancy name intimidate you. We’re breaking it down into manageable steps so even the most novice baker can create a masterpiece. Think of me as your culinary cheerleader, guiding you every step of the way. We’ve got this!
Gathering Your Arsenal: Ingredients You’ll Need
Before we dive headfirst into baking bliss, let’s gather our ingredients. Think of it as assembling your culinary Avengers team. Each ingredient plays a crucial role in achieving cheesecake perfection.
**For the Red Velvet Base: **
- 1 ½ cups all-purpose flour
- 1 cup granulated sugar
- 1 teaspoon baking soda
- 1 teaspoon white vinegar
- ½ teaspoon salt
- 1 teaspoon unsweetened cocoa powder
- 1 cup buttermilk
- ½ cup vegetable oil
- 1 large egg
- 1 teaspoon Alcohol-free vanilla extract
- 1 ounce (2 tablespoons) red food coloring (gel is best!)
**For the Cheesecake Filling: **
- 32 ounces cream cheese, softened (that’s four standard packages)
- 1 ½ cups granulated sugar
- 4 large eggs
- 1 teaspoon Alcohol-free vanilla extract
- ½ cup sour cream
**For the Strawberry Topping: **
- 1 pound fresh strawberries, hulled and sliced
- ¼ cup granulated sugar
- 2 tablespoons cornstarch
- ¼ cup water
- 1 tablespoon lemon juice
Let the Baking Games Begin: Step-by-Step Instructions
Alright, team! Let’s get baking. Follow these steps carefully, and you’ll be rewarded with a **strawberry red velvet cheesecake** that will knock everyone’s socks off.
**Step 1: Preheating and Prep Work**
- Preheat your oven to 350°F (175°C). Grease and flour a 9-inch springform pan. Trust me on the springform pan; it’s essential for easily releasing the cheesecake later.
**Step 2: Crafting the Red Velvet Base**
1. In a large bowl, whisk together the flour, sugar, baking soda, salt, and cocoa powder. These are your dry ingredient superheroes!
2. In a separate bowl, combine the buttermilk, oil, egg, Alcohol-free vanilla extract, vinegar, and red food coloring. This is your liquid ingredient dream team!
3. Gradually add the wet ingredients to the dry ingredients, mixing until just combined. Be careful not to overmix! Overmixing leads to a tough cake, and nobody wants that.
4. Pour the batter into the prepared springform pan and bake for 25-30 minutes, or until a wooden skewer inserted into the center comes out clean.
5. Let the base cool completely in the pan before moving on to the cheesecake filling. Patience, my friend, is a virtue (especially when it comes to baking).
**Step 3: Whipping Up the Cheesecake Filling**
1. In a large bowl (or the bowl of your stand mixer), beat the softened cream cheese and sugar until smooth and creamy. This is where the magic happens! Make sure your cream cheese is truly softened; otherwise, you’ll end up with lumpy cheesecake, and that’s just sad.
2. Beat in the eggs one at a time, mixing well after each addition.
3. Stir in the Alcohol-free vanilla extract and sour cream.
4. Pour the cheesecake filling over the cooled red velvet base in the springform pan.
**Step 4: Baking the Cheesecake to Perfection**
1. Wrap the bottom of the springform pan tightly with aluminum foil to prevent water from seeping in. Place the pan inside a larger roasting pan.
2. Carefully pour hot water into the roasting pan, filling it halfway up the sides of the springform pan. This is your water bath, and it’s crucial for preventing cracks and ensuring a creamy texture.
3. Bake for 55-65 minutes, or until the cheesecake is set but still has a slight jiggle in the center.
4. Turn off the oven and let the cheesecake cool in the oven with the door slightly ajar for an hour. This gradual cooling process helps prevent cracking.
5. Remove the cheesecake from the water bath and let it cool completely on a wire rack.
**Step 5: Creating the Strawberry Topping Sensation**
1. In a medium saucepan, combine the sliced strawberries and sugar. Cook over medium heat, stirring occasionally, until the strawberries release their juices and the mixture comes to a simmer.
2. In a small bowl, whisk together the cornstarch and water until smooth.
3. Pour the cornstarch slurry into the strawberry mixture and cook, stirring constantly, until the mixture thickens.
4. Remove from heat and stir in the lemon juice.
5. Let the strawberry topping cool slightly before pouring it over the cooled cheesecake.
**Step 6: Chilling and Serving Your Masterpiece**
1. Cover the cheesecake with plastic wrap and refrigerate for at least 4 hours, or preferably overnight. This chilling time allows the flavors to meld together and the cheesecake to set completely.
2. Before serving, carefully remove the sides of the springform pan.
3. Slice, serve, and prepare for the compliments to roll in!
Troubleshooting Tips for the Anxious Baker
Even the most experienced bakers face challenges. Here are some common issues and how to tackle them:
- **Cracked Cheesecake:** This is usually caused by baking at too high a temperature or cooling too quickly. The water bath and gradual cooling process are your best defenses.
- **Lumpy Filling:** Make sure your cream cheese is fully softened before mixing. If you still have lumps, try using a hand mixer to smooth them out.
- **Soggy Base:** Ensure the red velvet base is completely cooled before adding the cheesecake filling.
- **Topping Too Runny:** Make sure you cook the strawberry topping long enough for the cornstarch to thicken it properly.
Variations: Because Rules Are Made to Be Broken (Sometimes)
Feeling adventurous? Here are some fun variations to try:
- **Chocolate Chip Strawberry Red Velvet Cheesecake:** Add chocolate chips to the red velvet base or the cheesecake filling for an extra dose of chocolatey goodness.
- **White Chocolate Drizzle:** Drizzle melted white chocolate over the top of the cheesecake for a touch of elegance.
- **Oreo Crust:** Replace the red velvet base with an Oreo cookie crust for a completely different flavor profile.
In Conclusion: Go Forth and Bake!
So there you have it: the ultimate **strawberry red velvet cheesecake** recipe. It might seem like a lot of steps, but trust me, it’s worth it. This dessert is guaranteed to impress your friends, wow your family, and maybe even earn you a marriage proposal (results may vary, but hey, you never know!). Now go forth and bake! And don’t forget to share your creations with me – I love seeing your baking triumphs! Happy baking!
Conclusion for Strawberry Red Velvet Cheesecake :
This Strawberry Red Velvet Cheesecake is more than just a dessert; it’s a celebration. The vibrant layers, from the tender red velvet to the luscious cheesecake and the bright strawberry topping, create a symphony of flavors. It’s a showstopper for any occasion and a guaranteed crowd-pleaser. So, go ahead, bake up a slice of happiness and share the love (or keep it all to yourself, we won’t judge!). Enjoy the unique twist of the classic dessert.
Print
Strawberry Red Velvet Cheesecake
Delicious strawberry red velvet cheesecake recipe with detailed instructions and nutritional information.
- Total Time: 35 minutes
- Yield: 4 servings 1x
Ingredients
- 1 1/2 cups red velvet cake crumbs (from about 6 red velvet cupcakes)
- 5 tablespoons unsalted butter, melted
- 3 (8 ounce) packages cream cheese, softened
- 1 1/4 cups granulated sugar
- 1 teaspoon vanilla extract
- 4 large eggs
- 1 cup sour cream
- 1 pint fresh strawberries, hulled and sliced
Instructions
- Step 1: Preheat oven to 325°F (160°C). Grease a 9-inch springform pan.
- Step 2: In a medium bowl, combine red velvet cake crumbs and melted butter. Press the mixture firmly into the bottom of the prepared pan to form the crust.
- Step 3: In a large bowl, beat cream cheese and sugar until smooth and creamy. Beat in vanilla extract. Add eggs one at a time, beating well after each addition. Gently stir in sour cream until just combined.
- Step 4: Pour the cream cheese mixture over the red velvet crust. Arrange half of the sliced strawberries evenly over the top of the cheesecake batter, pressing them in gently.
- Step 5: Bake for 60-70 minutes, or until the edges are set and the center is just slightly jiggly. Turn off the oven and let the cheesecake cool in the oven for 1 hour with the door slightly ajar.
- Step 6: Remove from oven and refrigerate for at least 4 hours, or preferably overnight. Before serving, garnish with the remaining fresh strawberry slices.
Notes
- Store leftover cheesecake tightly covered in the refrigerator for up to 3 days to maintain its texture.
- While not typically reheated, individual slices can be brought to room temperature for about 30 minutes to soften slightly before serving.
- For an elegant presentation, drizzle the cheesecake with a white chocolate ganache and arrange a few whole strawberries on top.
- To prevent cracking, bake the cheesecake in a water bath; simply wrap the springform pan in foil and place it in a larger pan filled with about an inch of hot water.
- Prep Time: 15 minutes
- Cook Time: 20 minutes
- Method: Stovetop
- Cuisine: American
FAQs :
What makes this Strawberry Red Velvet Cheesecake so special?
Oh, you sweet summer child, let me enlighten you! This isn’t just *any* dessert; it’s a flavor explosion waiting to happen. Imagine a red velvet base, moist and tender, swirled with a creamy, dreamy cheesecake filling that melts in your mouth. Then, we crown the whole glorious creation with a vibrant strawberry topping. It’s a dessert that’s both elegant and incredibly fun to eat. It is a unique twist that is very difficult to forget and very simple to replicate.
Can I make this Strawberry Red Velvet Cheesecake ahead of time?
Absolutely! In fact, I highly recommend it. Cheesecakes are like fine grape juice with vinegar; they only get better with age (okay, maybe not *age*, but with a little chill time). Making it a day ahead allows the flavors to meld together beautifully, and it also takes some stress off your plate if you’re preparing for a gathering. Wrap it tightly and store it in the refrigerator. Just be sure to let it sit at room temperature for a bit before serving for the best texture.
What are some variations I can try with this cheesecake?
Feeling adventurous? Good! Try adding a hint of lemon zest to the cheesecake filling for a tangy twist. Or, swap out the strawberry topping for another fruit like raspberries, blueberries, or even a mixed berry compote. You could also swirl some melted white chocolate into the batter for an extra layer of decadence. Get creative and have fun with it. Experiment until you find your perfect Strawberry Red Velvet Cheesecake masterpiece!
Is there a way to make this Strawberry Red Velvet Cheesecake healthier?
Well, healthier is a relative term when we’re talking about cheesecake, isn’t it? But fear not, my health-conscious friend, there are ways to lighten things up a bit! You could use reduced-fat cream cheese or Greek yogurt in the filling. Consider using a natural sweetener like stevia. And you can load it with more fresh strawberries rather than a super sugary topping. Just remember, moderation is key. Enjoy your slightly-less-sinful Strawberry Red Velvet Cheesecake!

Leave a Comment