


Imagine biting into a velvety sphere of white chocolate, infused with the subtle tang of cream cheese and a hint of vanilla, all while being dusted with a shimmering, festive blue. These **Blue Winter holiday Truffles** aren’t just a treat; they’re a miniature snow globe of flavor, ready to make your taste buds sing carols.
Picture this: It’s Winter evening, the fire’s crackling, Bing Crosby’s crooning, and you’re popping one of these magical morsels into your mouth. The cool, creamy center melts on your tongue, leaving a delightful sweetness that screams, “Happy Holidays!”. Get ready to experience pure joy with every delectable bite!
Here are some reasons why you’ll absolutely adore these **Blue Winter holiday Truffles**:
- They’re ridiculously easy to make, even if your baking skills are questionable; think five ingredients and minimal effort for maximum wow factor.
- The flavor combination of sweet white chocolate, tangy cream cheese, and a touch of vanilla is simply irresistible, a symphony of taste that dances on your palate.
- Their stunning blue hue and shimmering dust make them a show-stopping centerpiece for any holiday dessert platter; prepare for gasps of admiration.
- These truffles are incredibly versatile; perfect as a homemade gift, a party treat, or a sneaky midnight snack when the kids are finally asleep.
Ingredients for Blue Winter holiday Truffles
Here’s what you’ll need to make this delicious dish:
The full ingredients list, including measurements, is provided in the recipe card directly below.
How to Make Blue Winter holiday Truffles
Follow these simple steps to prepare this delicious dish:
Step 1: Prepare the Cream Cheese Mixture
In a large bowl, beat the softened cream cheese with an electric mixer until smooth and creamy. Gradually add the powdered sugar, mixing until fully incorporated and no lumps remain. Stir in the Alcohol-free vanilla extract to enhance the flavor.
Step 2: Melt the White Chocolate
In a microwave-safe bowl, melt the white chocolate chips in 30-second intervals, stirring in between, until smooth and completely melted. Be careful not to overheat the chocolate. Alternatively, melt the chocolate over a double boiler.
Step 3: Combine the Ingredients
Pour the melted white chocolate into the cream cheese mixture. Mix until everything is evenly combined and the mixture is smooth. Cover the bowl with plastic wrap and refrigerate for at least 2 hours, or preferably overnight, to allow the mixture to firm up.
Step 4: Shape the Truffles
Once the mixture is firm, remove it from the refrigerator. Use a small spoon or cookie scoop to scoop out portions of the mixture. Roll each portion between your palms to form a smooth ball. Place the truffles on a baking sheet lined with parchment paper.
Step 5: Melt the Blue Candy Melts
In a separate microwave-safe bowl, melt the blue candy melts in 30-second intervals, stirring in between, until smooth and completely melted.
Step 6: Coat the Truffles
Dip each truffle into the melted blue candy melts, ensuring it is fully coated. Use a fork or dipping tools to remove the truffle and gently tap off any excess candy coating. Place the coated truffle back on the parchment-lined baking sheet. Immediately sprinkle with edible shimmer dust before the coating sets. Repeat with the remaining truffles.
Step 7: Set and Serve
Allow the coated truffles to set completely at room temperature or in the refrigerator for about 30 minutes. Once set, these Blue Winter holiday Truffles are ready to be served and enjoyed. Arrange on a festive platter or package them in decorative boxes for a delightful homemade gift. These truffles add a touch of elegance and sweetness to any holiday celebration.
Perfecting the Cooking Process

To achieve truffle nirvana, melt your white chocolate in gentle stages to avoid seizing. While the chocolate is melting, prep your other ingredients so they’re ready to incorporate quickly. This ensures a smooth, consistent mixture that sets beautifully.
Add Your Touch
Feeling adventurous? Try adding a pinch of sea salt to enhance the sweetness, or some dried lavender for a floral note. Instead of alcohol-free almond extract, a bit of lemon zest can brighten these delectable bites. Play around with different flavor combinations to create your signature batch!
Storing & Reheating
These little treasures are best kept in an airtight container in the fridge. They’ll stay fresh for up to a week, if they last that long! No reheating is necessary; just grab one straight from the fridge and savor the cool, creamy texture.
Here are some tips to elevate your Blue Winter holiday Truffles game:
- Use high-quality white chocolate for the best flavor and smoothest texture, as the chocolate is the star of this show.
- Gently toast the shredded coconut before coating the truffles to bring out its nutty flavor and add a delightful crunch.
- Don’t skip the chilling time! It’s essential for the truffles to firm up enough to be easily rolled and coated.
(Personal anecdote formated as paragraph subheading)
I once made these for a holiday party, and they were gone within minutes. My friend swore I’d bought them from a fancy chocolatier! That’s when I knew I had a winning recipe.
Let’s dive into making these delightful, eye-catching treats! These **Blue Winter holiday Truffles** aren’t just a dessert; they’re a conversation starter, a festive centerpiece, and a little burst of joy all rolled into one. Trust me; you’ll be the star of any holiday gathering with these beauties.
The Allure of Blue Winter holiday Truffles
Okay, let’s be honest. Who can resist something that looks as magical as these truffles? Imagine a snowy winter landscape, then picture these vibrant, shimmering blue spheres nestled among the treats. They’re like little edible sapphires, perfect for adding a touch of whimsy to your Winter holiday celebrations. More than that, they taste divine, offering a creamy, sweet escape from the usual holiday fare. These are not just dessert; they are an experience.
Why Blue? Why Now?
I get it; blue might not be the first color that springs to mind when you think of Winter holiday treats. Red and green usually steal the show. But that’s precisely why these **Blue Winter holiday Truffles** are so special! They stand out, offering a refreshing change from the norm. And let’s face it, everyone loves something a little different, a little unexpected. Plus, that mesmerizing blue hue just screams winter wonderland!
Beyond the Color
: A Flavor Symphony
Now, I know what you’re thinking: they look pretty, but how do they taste? Well, my friend, prepare to be amazed. These truffles are more than just a visual delight; they’re a flavor explosion in your mouth. The creamy white chocolate base, infused with a hint of almond (or your favorite extract), creates a rich, melt-in-your-mouth experience. Then, the toasted coconut coating adds a delightful texture contrast and a subtle nutty flavor that perfectly complements the sweetness.
Gathering Your Ingredients
Before we embark on this culinary adventure, let’s make sure we have all the necessary ingredients. Don’t worry, most of them are pantry staples, and the few special items are easily found at your local grocery store.
- 12 ounces high-quality white chocolate, chopped
- 1/2 cup heavy cream
- 1/4 cup unsalted butter, softened
- 1/2 teaspoon alcohol-free almond extract (or vanilla, lemon, or peppermint!)
- Blue food coloring gel (gel is key for vibrant color!)
- 1 cup shredded coconut, toasted
- Optional: edible glitter or shimmering sugar for extra sparkle
A Note on White Chocolate
Choosing the right white chocolate is crucial for the success of these **Blue Winter holiday Truffles**. Go for a high-quality brand that you enjoy eating on its own. Cheaper white chocolate can sometimes be waxy or have an artificial flavor, which will definitely impact the final result.
Toast Your Coconut Like a Pro
Toasting the coconut is a simple step that makes a world of difference. Spread the shredded coconut in a single layer on a baking sheet and bake at 350°F (175°C) for 5-7 minutes, or until lightly golden brown, stirring occasionally to prevent burning. Keep a close eye on it because coconut can go from perfectly toasted to burnt in a matter of seconds! The toasting process releases the coconut’s natural oils, enhancing its flavor and adding a delightful crunch.
The Truffle-Making Process
: Step-by-Step
Alright, now for the fun part! Let’s get our hands dirty (well, not literally, we’ll be using spoons and bowls) and create these magical **Blue Winter holiday Truffles**. Don’t be intimidated; the process is surprisingly simple, even for beginner bakers.
1. **Melt the White Chocolate: ** In a heat-safe bowl set over a saucepan of simmering water (double boiler), melt the white chocolate, stirring occasionally until smooth. Be careful not to let the bottom of the bowl touch the water, as this can cause the chocolate to seize. Alternatively, you can melt the chocolate in the microwave in 30-second intervals, stirring well between each interval, until smooth.
2. **Add Cream and Butter: ** Once the chocolate is melted, remove it from the heat and stir in the heavy cream and softened butter until everything is fully incorporated and the mixture is smooth and glossy.
3. **Flavor and Color: ** Stir in the alcohol-free almond extract (or your chosen flavoring) and then add the blue food coloring gel, a little at a time, until you reach your desired shade of blue. Remember, a little goes a long way with gel food coloring, so start with a few drops and gradually add more until you achieve that perfect winter wonderland hue.
4. **Chill Out: ** Cover the bowl with plastic wrap, pressing it directly onto the surface of the chocolate mixture to prevent a skin from forming. Refrigerate for at least 2 hours, or preferably overnight, until the mixture is firm enough to scoop and roll. This is crucial for the truffles to hold their shape.
5. **Roll ‘Em Up: ** Once the chocolate mixture is firm, use a small spoon or melon baller to scoop out portions of the mixture. Roll each portion between your palms to form a smooth ball. Don’t worry if they’re not perfectly round; imperfections add character!
6. **Coat in Coconut: ** Roll each truffle in the toasted shredded coconut, pressing gently to make sure the coconut adheres to the surface. If you’re using edible glitter or shimmering sugar, sprinkle it over the truffles while the coconut is still slightly moist.
7. **Final Chill: ** Place the coated **Blue Winter holiday Truffles** on a baking sheet lined with parchment paper and refrigerate for another 30 minutes to allow them to fully set.
8. **Serve and Enjoy: ** Once the truffles are firm, they’re ready to be served and enjoyed! Store them in an airtight container in the refrigerator for up to a week.
Tips and Tricks for Truffle Success
Making truffles is relatively straightforward, but a few insider tips can help you achieve truffle perfection every time.
- **Temperature is Key:** Be careful not to overheat the white chocolate when melting it, as this can cause it to seize and become grainy. Low and slow is the name of the game.
- **Don’t Rush the Chilling Process:** The chilling time is essential for the truffles to firm up enough to be easily rolled and coated. Resist the temptation to skip this step!
- **Get Creative with Coatings:** While toasted coconut is a classic choice, feel free to experiment with other coatings, such as chopped nuts, cocoa powder, or even crushed candy canes.
- **Make Ahead of Time:** **Blue Winter holiday Truffles** can be made several days in advance, making them perfect for holiday entertaining. Just store them in an airtight container in the refrigerator until you’re ready to serve them.
Troubleshooting Common Truffle Problems
- **Chocolate Seized?** Don’t panic! Sometimes, white chocolate can seize when it comes into contact with even a tiny bit of water. Try adding a tablespoon of vegetable oil or shortening and stirring vigorously. This can sometimes help to bring the chocolate back together.
- **Truffles Too Soft?** If your truffle mixture is too soft to roll, it probably needs more chilling time. Place it back in the refrigerator for another hour or two and try again.
- **Coconut Not Sticking?** If the coconut isn’t sticking to the truffles, try gently pressing it onto the surface with your fingers. You can also lightly dampen your hands with water before rolling the truffles, which will help the coconut adhere.
Variations on a Theme
: Expanding Your Truffle Horizons
The basic **Blue Winter holiday Truffle** recipe is a fantastic starting point, but don’t be afraid to get creative and put your own spin on it. Here are a few ideas to get your creative juices flowing:
- **Peppermint Bliss:** Add a few drops of peppermint extract to the white chocolate mixture for a festive, minty twist. Crush some peppermint candies and sprinkle them over the truffles for extra flavor and crunch.
- **Lemon Zest Delight:** Brighten up the truffles with a teaspoon of lemon zest. The citrusy flavor pairs beautifully with the sweetness of the white chocolate.
- **Nutty Indulgence:** Add chopped almonds, walnuts, or pecans to the white chocolate mixture for a nutty crunch. Coat the truffles in finely chopped nuts instead of coconut.
- **Spiced Wonder:** Infuse the white chocolate mixture with a pinch of cinnamon, nutmeg, or cardamom for a warm, spiced flavor.
These **Blue Winter holiday Truffles** are more than just a recipe; they’re a canvas for your creativity. Feel free to experiment with different flavors, colors, and coatings to create your own signature truffle masterpiece. So, go ahead, unleash your inner chocolatier and spread some holiday cheer with these delightful, shimmering blue treats!
(Personal anecdote formated as paragraph subheading)
My grandma always said, “A little bit of blue can brighten any day.” She would have loved these truffles, little bursts of joy that add magic to every gathering.
Remember, the most important ingredient is love and a sprinkle of holiday spirit! Happy truffle-making!
Conclusion for Blue Winter holiday Truffles
These easy Blue Winter holiday Truffles are more than just a dessert; they’re a delightful way to spread holiday cheer. Their eye-catching color and delicious flavor make them a memorable treat for any gathering. From the creamy white chocolate center to the festive sprinkles, each bite is a celebration of the season. So, get in the kitchen, embrace your inner chocolatier, and create a batch of these delightful truffles. They’re sure to bring a smile to everyone’s face and become a new holiday tradition.
Print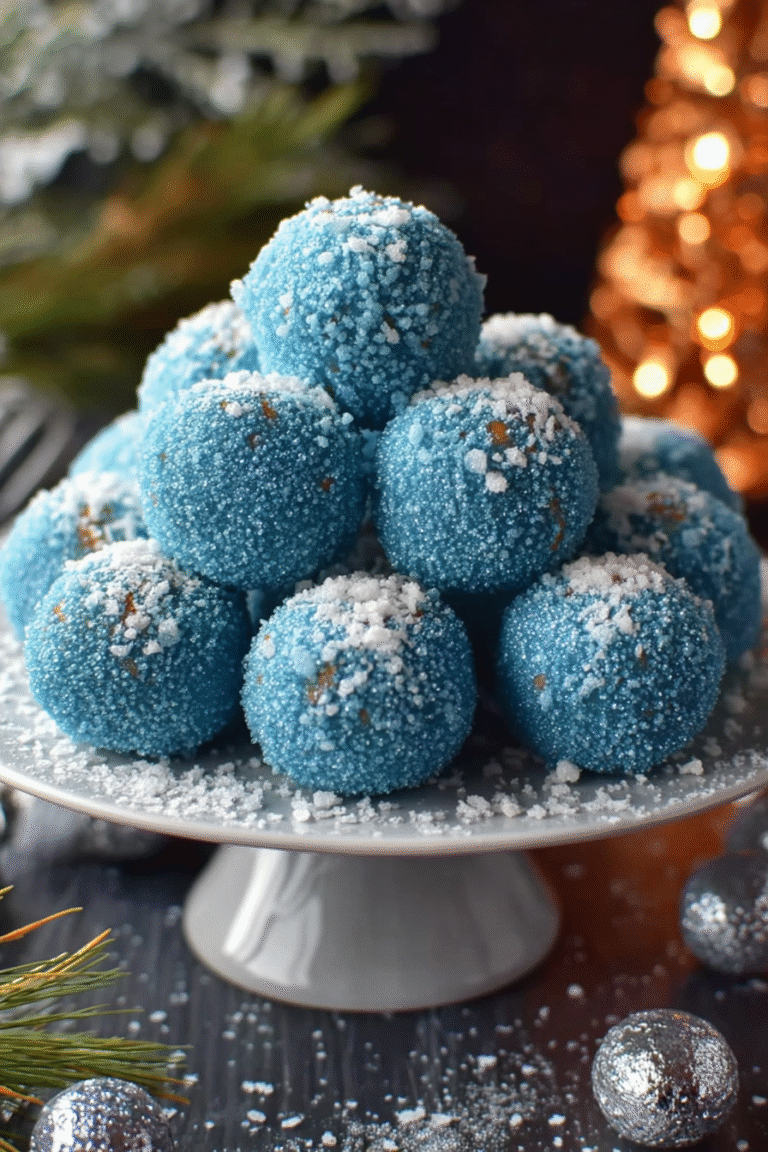
Blue Christmas Truffles
Delicious blue christmas truffles recipe with detailed instructions and nutritional information.
- Total Time: 35 minutes
- Yield: 4 servings
Ingredients
- Cream cheese, softened: 8 ounces
- Powdered sugar: 2 cups
- White chocolate chips: 12 ounces
- Blue food coloring: 10-15 drops, or to desired color
- Vanilla extract: 1 teaspoon
- Shortening: 1 teaspoon
- Crushed vanilla wafers: 1 cup
Instructions
- Step 1: In a large bowl, beat the softened cream cheese with an electric mixer until smooth. Gradually add the powdered sugar, mixing until well combined.
- Step 2: Stir in the vanilla extract and gradually add the blue food coloring until the desired shade of blue is achieved.
- Step 3: Melt the white chocolate chips and shortening in a microwave-safe bowl in 30-second intervals, stirring in between, until smooth and completely melted.
- Step 4: Add the melted white chocolate to the cream cheese mixture and stir until fully incorporated. Refrigerate the mixture for at least 2 hours, or until firm enough to handle.
- Step 5: Roll the chilled mixture into 1-inch balls and then roll each ball in the crushed vanilla wafers to coat.
- Step 6: Place the coated truffles on a baking sheet lined with parchment paper and refrigerate for at least 30 minutes before serving to allow them to firm up.
Notes
- Store the truffles in an airtight container in the refrigerator for up to a week to maintain their shape and freshness.
- These truffles are best served chilled, so no reheating is necessary!
- Arrange the Blue Christmas Truffles on a festive platter with a dusting of powdered sugar for an elegant holiday presentation.
- For easier rolling, lightly grease your hands with shortening to prevent the truffle mixture from sticking.
- Prep Time: 15 minutes
- Cook Time: 20 minutes
- Method: Stovetop
- Cuisine: American
FAQs
What makes these Blue Winter holiday Truffles so festive?
These aren’t your average truffles; they are a delightful treat for the eyes and the taste buds! The vibrant blue color comes from natural food coloring, giving them a magical, wintery feel that screams holiday cheer. Imagine presenting a platter of these at your next gathering – pure delight! Beyond the aesthetics, it is the perfect combination of smooth, creamy white chocolate and the subtle crunch of festive sprinkles that truly elevates these truffles to Winter holiday superstar status. Each bite is like a tiny, edible celebration!
How do I store my homemade Blue Winter holiday Truffles?
Proper storage is key to maintaining the perfect texture and flavor of your lovely creation. You should keep your delicious creation in an airtight container in the refrigerator. This helps prevent them from melting or becoming sticky. They’ll happily stay fresh for up to a week, ready to be enjoyed whenever a sweet craving strikes. If you’re planning ahead, these can also be frozen for longer storage. Just remember to thaw them in the fridge before serving to prevent any condensation from ruining their appearance.
Can I use different types of chocolate for these easy Blue Winter holiday Truffles?
Absolutely! While the recipe calls for white chocolate to achieve that lovely blue hue, feel free to experiment. Milk chocolate would add a richer, deeper flavor, though it will change the final color. Dark chocolate could create a surprisingly sophisticated contrast with the sweet blue coating. Each type of chocolate will offer a unique twist, so have fun and discover your favorite version. Remember to adjust the sweetness of the filling if you opt for dark chocolate.
What if my Blue Winter holiday Truffle mixture is too soft to roll?
Don’t panic; this happens! The key is patience and a little bit of chilling. If your mixture is too soft, simply pop it back into the refrigerator for another 30 minutes to an hour. This will allow the chocolate to firm up, making it much easier to handle and roll into perfect little spheres. You can also add a tablespoon or two of powdered sugar to help absorb some of the excess moisture if needed. Remember, a slightly firm mixture is much easier to work with.


Leave a Comment