


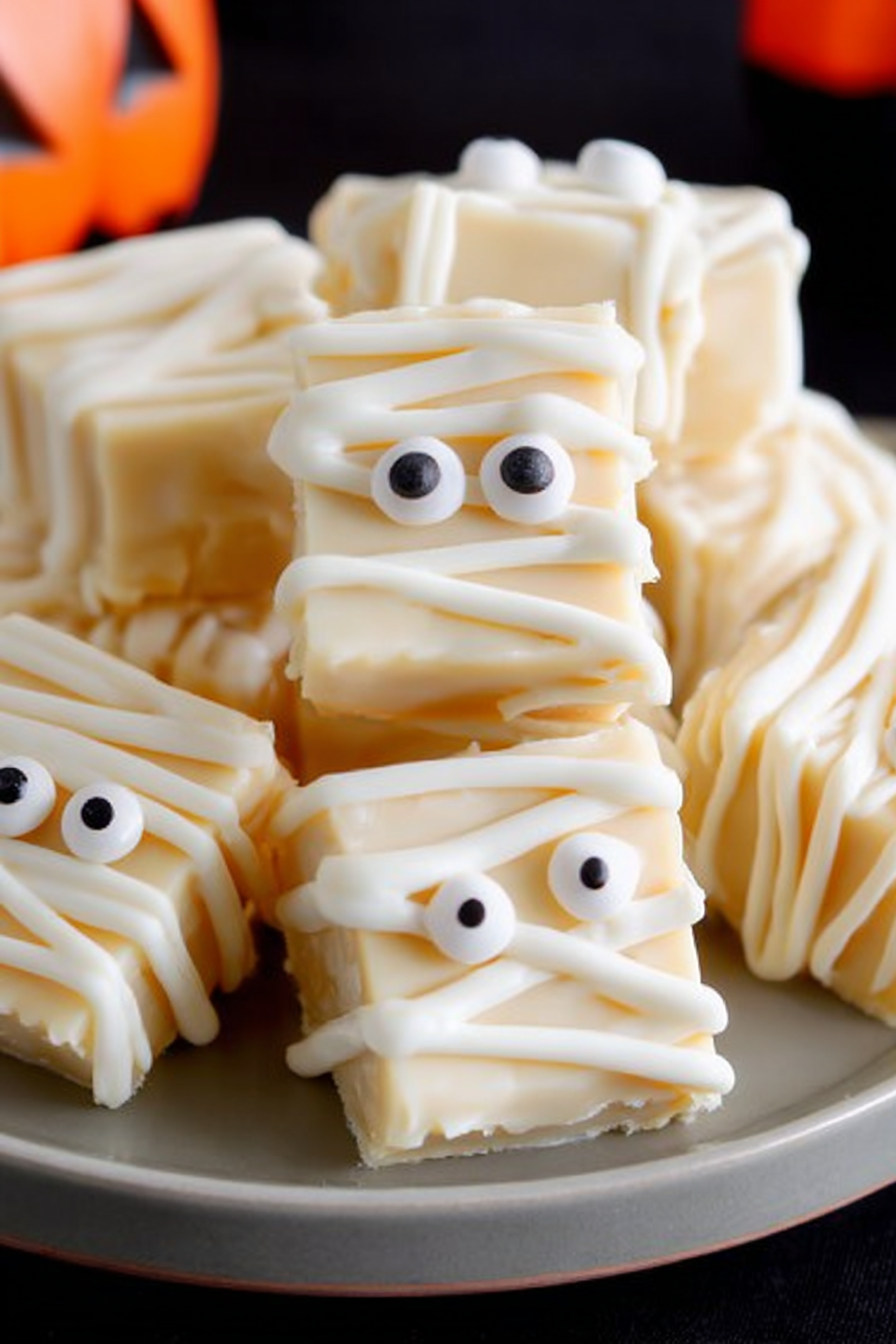
Imagine biting into a creamy, melt-in-your-mouth treat that looks like a spooky, yet adorable, mummy. This Easy White Chocolate Mummy Fudge Recipe for Autumn celebration is guaranteed to be the star of your spooky season dessert spread!
Get ready for a simple and fun activity that will impress your family and friends with its incredible taste and festive charm. Let’s dive into the sweet world of mummy fudge!
Here’s why you’ll be obsessed with this recipe:
- It’s incredibly easy to make, even if you’re not a seasoned candy maker, guaranteeing a delightful Autumn celebration treat.
- The combination of creamy white chocolate and spooky decoration creates an irresistibly delicious and visually appealing treat.
- You can customize the decorations with different candies and sprinkles, making each mummy fudge batch unique and festive.
- This fudge is perfect for Autumn celebration parties, school events, or a fun family activity, offering versatility for all your holiday needs.
Ingredients for Easy White Chocolate Mummy Fudge Recipe for Autumn celebration
Here’s what you’ll need to make this delicious dish:
The full ingredients list, including measurements, is provided in the recipe card directly below.
How to Make Easy White Chocolate Mummy Fudge Recipe for Autumn celebration
Follow these simple steps to prepare this delicious dish:
Step 1: Prepare the Fudge Base
In a large, microwave-safe bowl, combine the white chocolate chips and sweetened condensed milk. Microwave in 30-second intervals, stirring in between, until the chocolate is completely melted and smooth. Be careful not to overheat!
Step 2: Flavor and Texture
Stir in the Alcohol-free vanilla extract and a pinch of salt into the melted chocolate mixture. Mix well until everything is fully combined and the mixture is glossy.
Step 3: Set the Fudge
Line an 8×8 inch baking pan with parchment paper, leaving some overhang on the sides. Pour the fudge mixture into the prepared pan and spread it evenly with a spatula.
Step 4: Add Candy Eyes
Gently press candy eyes onto the fudge surface before it sets. Space them out evenly to create the mummy faces.
Step 5: Create Mummy Wrappings
Melt the white chocolate bark or coating in a separate bowl, using the same microwave method as before. Drizzle the melted chocolate over the fudge in a crisscross pattern to resemble mummy wrappings. Be creative and have fun with it!
Step 6: Chill and Serve
Refrigerate the fudge for at least 2 hours, or until it is firm. Once set, lift the fudge out of the pan using the parchment paper overhang. Cut into squares and serve your spooky mummy fudge!
Perfecting the Cooking Process
To achieve fudge nirvana, melt the white chocolate and sweetened condensed milk slowly over low heat. Stir constantly to prevent burning. Once smooth, work quickly to add your mix-ins and get it into the pan before it sets!
Add Your Touch
Unleash your inner artist! Swap out the pretzel sticks for broken cookies, or use different types of candies for the eyes. A dash of orange zest can add a surprising pop of flavor to this easy treat.
Storing & Reheating
Store your mummy fudge in an airtight container at room temperature for up to a week. No need to reheat… unless you want a gooey, melty mess! But honestly, who would do that? (Maybe me.)
- Don’t overcook the white chocolate! Burnt white chocolate is a sad situation. Low and slow is the way to go.
- Line your pan with parchment paper for easy removal. Trust me, you’ll thank me later. No one wants fudge stuck to the pan.
- Let the fudge set completely before cutting. Patience is a virtue, especially when it comes to fudge.
(Personal anecdote formated as paragraph subheading)
Last Autumn celebration, my nephew insisted on adding gummy worms to our mummy fudge. The result? Hilariously creepy and surprisingly delicious. The kids went wild for them!
Unearthing the Secrets of the Easy White Chocolate Mummy Fudge Recipe for Autumn celebration
Autumn celebration. The time for ghosts, goblins, and, most importantly, candy. But let’s be honest, store-bought candy can be a bit…blah. This year, ditch the boring chocolates and dive headfirst into a batch of Easy White Chocolate Mummy Fudge Recipe for Autumn celebration that will have everyone screaming with delight (and maybe a little sugar rush). Forget complicated recipes and hours in the kitchen; this recipe is so simple, even a zombie could make it (with a little help, perhaps). We’re talking a treat that’s both spooky and spectacularly delicious. So, gather your ingredients, put on your favorite Autumn celebration playlist, and let’s get mummified!
Why This Easy White Chocolate Mummy Fudge Recipe for Autumn celebration Rocks
This isn’t your grandma’s fudge (unless your grandma is exceptionally cool and into Autumn celebration themes). This Easy White Chocolate Mummy Fudge Recipe for Autumn celebration is a game-changer for several reasons:
- **Ridiculously Easy:** Seriously, if you can melt chocolate, you can make this. It’s a perfect no-bake treat, ideal for busy parents or anyone who wants a quick and impressive dessert.
- **Customizable:** Want to add sprinkles? Go for it. Prefer different candies for the eyes? Be my guest. This recipe is a blank canvas for your Autumn celebration creativity.
- **Crowd-Pleasing:** From tiny trick-or-treaters to grown-up ghouls, everyone loves fudge. And when it’s dressed up as a mummy, it’s even more irresistible.
- **Budget-Friendly:** No need to break the bank on fancy ingredients. This fudge uses simple, affordable staples that you probably already have in your pantry.
- **Spooktacularly Fun:** Let’s be real, the best part is decorating the mummies! Get the kids involved and turn it into a Autumn celebration activity.
The Cast of Characters: Ingredients for Your Mummy Fudge
Before we start our spooky cooking adventure, let’s gather our ingredients. Don’t worry, you won’t need any rare or hard-to-find items. This recipe is all about simplicity and deliciousness. Here’s what you’ll need for this Easy White Chocolate Mummy Fudge Recipe for Autumn celebration:
- **White Chocolate Chips:** The star of the show! Use good-quality white chocolate for the best flavor and melting consistency. About 24 ounces should do the trick.
- **Sweetened Condensed Milk:** This magical ingredient makes the fudge creamy and decadent. One 14-ounce can is all you need.
- **Alcohol-free vanilla extract:** A touch of vanilla enhances the sweetness and adds a warm, comforting flavor. A teaspoon will do.
- **Pretzel Sticks:** These form the “bandages” for our mummies. Get the skinny pretzel sticks for easier application.
- **Candy Eyes:** Because every mummy needs eyes! You can find these at most grocery stores or craft stores, especially around Autumn celebration.
- **Optional Sprinkles:** Because sprinkles make everything better. Choose your favorite Autumn celebration-themed sprinkles for extra flair.
- **Pinch of Salt:** Just a tiny pinch to balance the sweetness.
That’s it! See? Nothing scary about that ingredient list. Now, let’s move on to the fun part: making the fudge!
The Mummy-Making Process: Step-by-Step Instructions for This Easy White Chocolate Mummy Fudge Recipe for Autumn celebration
Alright, let’s get down to business. Here’s how to create this Easy White Chocolate Mummy Fudge Recipe for Autumn celebration in just a few simple steps. I promise, it’s easier than escaping a haunted house.
1. **Prep Your Pan: ** Line an 8×8 inch square pan with parchment paper. This will make it super easy to remove the fudge later. Trust me, you don’t want to be scraping fudge off a pan on Autumn celebration night.
2. **Melt the Chocolate: ** In a large, microwave-safe bowl, combine the white chocolate chips and sweetened condensed milk. Microwave in 30-second intervals, stirring after each interval, until the chocolate is completely melted and smooth. Be careful not to overheat the chocolate, or it will seize up. If you prefer, you can melt the chocolate in a double boiler over simmering water.
3. **Stir in Vanilla: ** Once the chocolate is melted, stir in the Alcohol-free vanilla extract and a pinch of salt. Mix until everything is well combined.
4. **Pour into Pan: ** Pour the melted chocolate mixture into the prepared pan and spread it out evenly.
5. **Add the Bandages: ** Now comes the fun part! Gently press the pretzel sticks into the fudge in a random, crisscross pattern to create the mummy bandages. Leave some space for the eyes.
6. **Add the Eyes: ** Place the candy eyes onto the fudge, making sure they are securely attached. Get creative with the placement!
7. **Sprinkle (Optional): ** If you’re using sprinkles, now is the time to sprinkle them over the fudge.
8. **Chill Out: ** Cover the pan with plastic wrap and refrigerate for at least 2 hours, or until the fudge is firm.
9. **Cut and Serve: ** Once the fudge is firm, remove it from the pan using the parchment paper. Cut it into squares and serve.
Voila! You’ve just created a batch of Easy White Chocolate Mummy Fudge Recipe for Autumn celebration that will impress everyone.
Variations and Add-Ins: Spicing Up Your Mummy Fudge
The beauty of this Easy White Chocolate Mummy Fudge Recipe for Autumn celebration is that it’s incredibly versatile. Feel free to get creative and add your own personal touch. Here are a few ideas to get you started:
- **Add Some Crunch:** Mix in chopped nuts, like almonds or pecans, for added texture.
- **Spice It Up:** Add a pinch of cinnamon or nutmeg for a warm, spicy flavor.
- **Go Fruity:** Stir in dried cranberries or chopped candied ginger for a festive twist.
- **Get Nutty:** Add a spoonful of peanut butter or almond butter to the melted chocolate for a nutty flavor.
- **Chocolate Swirl:** Melt some semi-sweet chocolate chips and swirl them into the white chocolate fudge for a marbled effect.
Troubleshooting Tips: Avoiding Fudge Fails
Even the easiest recipes can sometimes go awry. Here are a few troubleshooting tips to help you avoid common fudge fails and ensure your Easy White Chocolate Mummy Fudge Recipe for Autumn celebration turns out perfectly every time:
- **Chocolate Seizing:** If your chocolate seizes up (becomes thick and grainy), don’t panic! Try adding a teaspoon of vegetable oil or shortening and stirring vigorously. This can sometimes help to smooth it out.
- **Fudge Not Setting:** If your fudge isn’t setting properly, it could be due to too much moisture. Make sure you’re using good-quality white chocolate chips and that your sweetened condensed milk isn’t expired. You can also try chilling the fudge for a longer period of time.
- **Pretzels Falling Off:** If your pretzel stick bandages are falling off, try dipping them in melted white chocolate before pressing them into the fudge. This will help them adhere better.
The Ultimate Easy White Chocolate Mummy Fudge Recipe for Autumn celebration: A Delicious Conclusion
So, there you have it! An Easy White Chocolate Mummy Fudge Recipe for Autumn celebration that’s both simple to make and spooktacularly delicious. This recipe is perfect for Autumn celebration parties, trick-or-treaters, or just a fun family activity. Get creative with your decorations, experiment with different add-ins, and most importantly, have fun! After all, Autumn celebration is all about embracing the spooky spirit and indulging in some sweet treats. Happy haunting, and happy baking!
Frequently Asked Questions About This Easy White Chocolate Mummy Fudge Recipe for Autumn celebration
Still have questions about making this spooky treat? Don’t worry, we’ve got you covered! Here are some frequently asked questions about our Easy White Chocolate Mummy Fudge Recipe for Autumn celebration:
Can I use a different type of chocolate?
While this recipe is specifically designed for white chocolate, you can experiment with other types of chocolate if you prefer. Milk chocolate or dark chocolate would also work well. Just keep in mind that the flavor and sweetness will be different.
Can I make this fudge ahead of time?
Absolutely! This fudge can be made up to a week in advance. Just store it in an airtight container at room temperature or in the refrigerator.
Can I freeze this fudge?
Yes, you can freeze this fudge for up to 2 months. Wrap it tightly in plastic wrap and then place it in a freezer-safe bag or container. Thaw it in the refrigerator before serving.
Can I use different types of candy for the eyes?
Of course! Get creative with your candy eye choices. Mini chocolate chips, M&Ms, or even small gumdrops would all work well.
Can I make this recipe vegan?
While this recipe as written is not vegan, you can make it vegan by using vegan white chocolate chips and vegan sweetened condensed milk. These ingredients are becoming more readily available at most grocery stores.
My fudge is too soft. What did I do wrong?
If your fudge is too soft, it could be due to a few reasons. You may not have cooked the chocolate long enough, or you may have used too much liquid. Try chilling the fudge for a longer period of time to see if it firms up. If not, you may need to adjust the recipe next time.
My fudge is too hard. What did I do wrong?
If your fudge is too hard, it could be because you overcooked the chocolate or used too little liquid. Unfortunately, there’s not much you can do to fix hard fudge. Just be sure to follow the recipe carefully next time.
Conclusion for Easy White Chocolate Mummy Fudge Recipe for Autumn celebration:
This Easy White Chocolate Mummy Fudge Recipe for Autumn celebration is a guaranteed crowd-pleaser, offering a delightful mix of spooky fun and sweet satisfaction. Remember, the key to success lies in the quality of your ingredients and paying close attention to the melting process. Feel free to experiment with variations and add your own creative touch to make it truly unique. Store your fudge properly to keep it fresh, and don’t be afraid to troubleshoot if things don’t go perfectly. Most importantly, have fun and enjoy sharing this ghoulishly delicious treat with friends and family. Happy Autumn celebration!
Print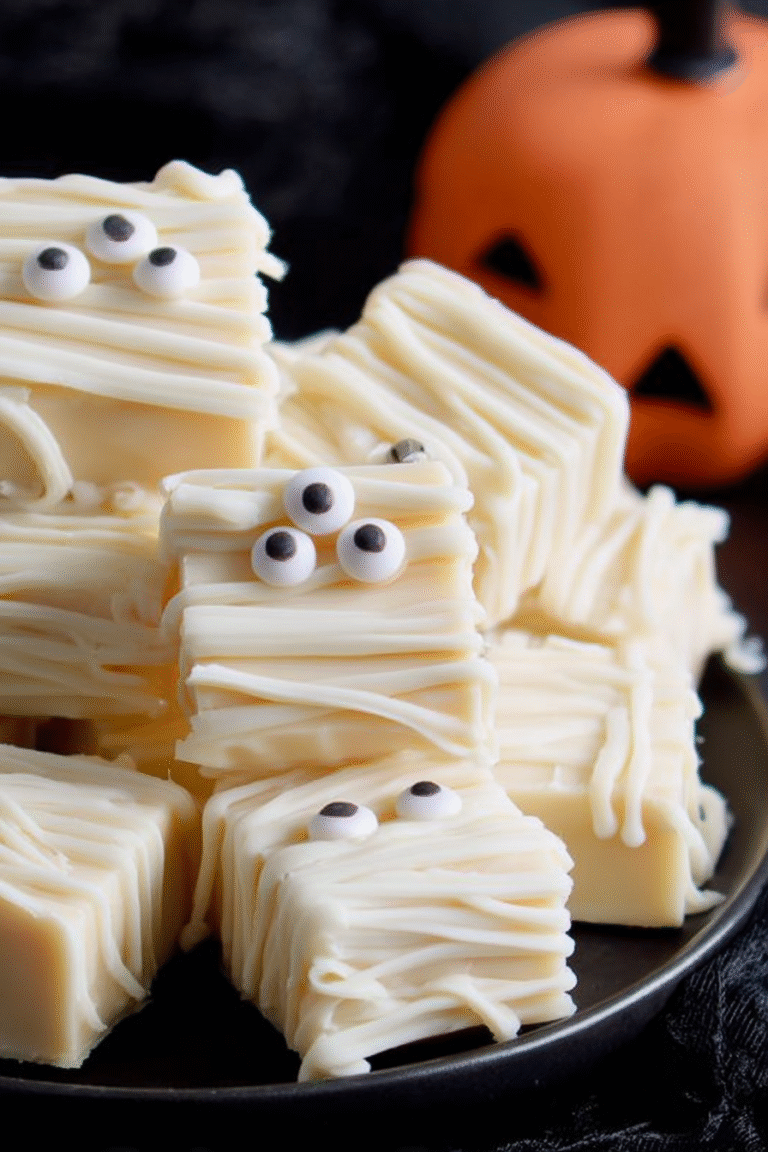
Easy White Chocolate Mummy Fudge Recipe for Halloween
Delicious easy white chocolate mummy fudge recipe for halloween recipe with detailed instructions and nutritional information.
- Total Time: 35 minutes
- Yield: 4 servings 1x
Ingredients
- 16 ounces white chocolate chips
- 1 (14 ounce) can sweetened condensed milk
- 2 tablespoons butter, softened
- 1/4 teaspoon salt
- 1 teaspoon vanilla extract
- Candy eyes
- 1/4 cup white chocolate, melted (for drizzling)
Instructions
- Step 1: Line an 8×8 inch baking pan with parchment paper, leaving an overhang on the sides. This will make it easier to remove the fudge later.
- Step 2: In a large microwave-safe bowl, combine the white chocolate chips, sweetened condensed milk, butter, and salt.
- Step 3: Microwave in 30-second intervals, stirring well after each interval, until the chocolate is completely melted and smooth. Be careful not to overheat the chocolate.
- Step 4: Stir in the vanilla extract. Pour the mixture into the prepared baking pan and spread evenly.
- Step 5: Immediately press candy eyes into the fudge in a random pattern to resemble mummy eyes.
- Step 6: Melt the remaining 1/4 cup of white chocolate. Drizzle it over the fudge in a back-and-forth motion to create the mummy wrappings. Let the fudge set in the refrigerator for at least 2 hours before cutting into squares.
Notes
- Store leftover mummy fudge in an airtight container in the refrigerator for up to a week to keep it firm and prevent it from melting.
- This fudge is best served chilled or at room temperature, cut into small squares for a spooky sweet treat.
- For a creamier fudge, make sure your butter is completely softened before microwaving.
- If your drizzled mummy wrappings are too thick, gently warm the melted white chocolate in 10-second intervals to thin it out slightly.
- Prep Time: 15 minutes
- Cook Time: 20 minutes
- Method: Stovetop
- Cuisine: American
FAQs:
Can I make this Easy White Chocolate Mummy Fudge Recipe for Autumn celebration ahead of time?
Absolutely! In fact, making this fudge ahead of time is a great idea. It allows the flavors to meld together even more, resulting in a richer, more delicious treat. You can prepare it up to 3 days in advance. Just store it in an airtight container in the refrigerator. Then, when your spooky guests arrive, simply cut it into squares, add your candy eyes and bandage decorations, and voila! You have a delightful Autumn celebration treat that is ready to impress. This little make-ahead trick will save you time and stress on the big day!
What are some variations I can make to this Easy White Chocolate Mummy Fudge Recipe for Autumn celebration?
Get creative! Instead of plain white chocolate, try using flavored white chocolate, such as cookies and cream or peppermint. You can also mix in different types of nuts, like chopped pecans or walnuts, for added texture and flavor. For the “bandages,” experiment with different colors of candy melts or even tinted buttercream frosting. And if you’re feeling extra adventurous, swirl in a bit of peanut butter or caramel for a truly decadent treat. Remember, this Easy White Chocolate Mummy Fudge Recipe for Autumn celebration is your canvas – let your imagination run wild!
How should I store the Easy White Chocolate Mummy Fudge Recipe for Autumn celebration?
Proper storage is key to keeping your mummy fudge fresh and delicious. Once the fudge has set and you’ve added your decorations, cut it into squares and store it in an airtight container. If you live in a warm climate, it’s best to keep it in the refrigerator to prevent the white chocolate from melting. Otherwise, you can store it at room temperature in a cool, dry place. Fudge stored properly can last for up to a week, but let’s be honest, it probably won’t last that long!
My fudge is too soft. What did I do wrong making Easy White Chocolate Mummy Fudge Recipe for Autumn celebration?
Ah, the dreaded soft fudge! This can happen if the mixture didn’t reach a high enough temperature during cooking, or if the humidity in your kitchen is high. Don’t panic! You can try re-melting the fudge and cooking it again, making sure to use a candy thermometer to reach the proper temperature. Alternatively, you can add a bit of powdered sugar to the mixture to help it firm up. And next time, maybe check the weather forecast before you start! A dry day is your fudge’s best friend.

Leave a Comment